Introduction
In today’s digitally-driven world, the rise of e-commerce is impossible to ignore. With the proliferation of the internet and smart devices, more and more consumers are turning to online shopping as a convenient and efficient way to meet their purchasing needs. From clothes and gadgets to groceries and home essentials, you name it, and there’s an online store for it. In this landscape, having a robust online presence isn’t just an added bonus for businesses – it’s a necessity.
One of the most popular ways to establish an online presence is through Shopify, a comprehensive e-commerce platform that’s as powerful as it is user-friendly. Not only does it provide a host of features to tailor your online store to your needs, but it also makes it incredibly simple to get started. You don’t need to be a tech guru or a seasoned business professional to set up Shopify store. With just a few clicks and key information, you can have your online shop up and running.
So, if you’ve been considering diving into the world of e-commerce or expanding your business’s reach, you’re in the right place. Welcome to “The Ultimate Guide to set up Shopify Store.” We will walk you through the entire process, from signing up and choosing your theme to customizing your store and optimizing it for success. By the end of this guide, you’ll be well-equipped to set up Shopify store and start driving your online sales. Let’s get started!

Table of Contents
Why choose shopify?
When choosing an e-commerce platform for your business, several options may come to mind. However, Shopify consistently rises to the top as a leading choice among entrepreneurs. Its reputation isn’t just for show – it is earned through robust features, unparalleled ease of use, and the countless success stories born from its platform.
Shopify is not just an e-commerce platform; it’s a comprehensive toolbox for businesses of all sizes, from budding startups to large-scale enterprises. Its accessibility and customization make it easy to create an online store that truly reflects your brand. But what really sets Shopify apart are its extensive features, many of which are designed to drive business success.
With Shopify, you’re not just setting up an online store; you’re creating an e-commerce powerhouse. It offers a multitude of themes and customization options, robust SEO tools, mobile optimization, integrated payment options, and excellent inventory management. Not to mention its advanced analytics, which provide insightful data to help you understand your audience and make data-driven decisions.
Moreover, Shopify provides a variety of marketing tools, including email marketing integration, social media integration, and the ability to create and manage promotional discounts. Its user-friendly interface and 24/7 customer support ensure that you always have the help you need to set up shopify store.
But perhaps the most compelling reason to choose Shopify are the success stories it has helped to create. Countless entrepreneurs have set up Shopify store and turned it into a thriving business. For instance, Gymshark, an athletic apparel company, started as a small Shopify store and is now valued at over a billion dollars. Another notable example is the home goods store, SoYoung, which experienced a 400% growth in sales after shifting their business to Shopify.
These stories attest to the power and potential of Shopify. Whether you’re a small artisan looking to share your craft with the world or a business with big dreams of e-commerce dominance, Shopify is equipped with the tools and features to help you turn your vision into a reality.
Steps to Set Up Your Shopify Store
Signing Up for Shopify
The first step to setting up your Shopify store is, naturally, signing up for a Shopify account. Here are detailed instructions to guide you through the process:
- Visit the Shopify Website: Go to www.shopify.com. Once you’re on the website, click on the “Start free trial” button. Shopify offers a 14-day free trial, which is a great way to explore the platform’s features before committing to a paid plan.

- Provide Some Additional Information: After this, Shopify will ask for some additional information like your name, address, country, and phone number.


- Tell Shopify about your business: You will also be asked a few questions about your business – like what you are selling and your current revenue. If you’re just starting out, you can select ‘I’m just playing around’ in the ‘Do you have products?’ dropdown, and ‘I’m not sure’ in the ‘What is your current revenue?’ dropdown.

- Enter Your Email Address: You will be prompted to enter your email address. Ensure that this is a valid email that you have access to because it will be used for all future correspondence and account recovery processes.

- Create a Password: Choose a secure password. Remember, this protects your business information, so it’s essential to create a strong, unique password.

- Name Your Store: Here, you will be asked to provide a name for your store. This name will be used to create your store’s default URL (e.g., YourStoreName.myshopify.com). The name should be unique; if it’s already taken by another store, you will need to choose a different name.
- Complete the Signup Process: Click on the “Enter My Store” button.
Congratulations! You’ve signed up for Shopify and created your account. Your journey to set up Shopify store has just begun.
Please note that this will create your store as a trial store. To fully unlock the functionality of Shopify, you will need to pick a plan and enter your payment details. However, you won’t be charged until your 14-day free trial is over. In the next steps, we’ll walk through how to fully set up Shopify store, including choosing your theme, customizing your store, adding products, and more.
Selecting Your Shopify Theme
One of the key steps to setting up your Shopify store is selecting the right theme. Your theme determines how your online shop looks and feels. It’s the first impression customers will have of your store, and it can significantly influence their shopping experience. The right theme not only appeals aesthetically to your customers, but it also complements your brand’s identity and the products you sell.
Shopify offers a range of free and paid themes that are professionally designed and responsive across devices. Each theme has unique features and layouts, offering different options for product displays, colors, typography, and more.
Here are some popular Shopify themes that are favored by many successful online stores:
- Debut: This is a free, flexible theme with a clean, simple design that’s perfect for those just starting out. It offers features like product filtering, promotion banners, and customer testimonials.
- Brooklyn: Another free theme, Brooklyn is designed specifically for modern apparel stores with a focus on brand and product imagery. It has dynamic grid layouts and a slide-out cart for easy checkout.
- Supply: Ideal for stores with large inventories, the Supply theme is free and offers a clean, organized look. Its features include product filtering, sidebar navigation, and a slideshow.
- Narrative: Narrative is a free theme designed for visual storytelling. It’s ideal for stores with a small number of products and offers features like hero video, vertical slideshow, and wide layout.
- Shoptimized: A premium theme, Shoptimized offers over 30 features designed to increase conversions, including urgency timers, shipping time estimator, and product tabs.
- Wokiee: Another popular paid theme, Wokiee, is known for its versatility and design. It offers numerous layouts and customization options.
Remember, the theme you select should align with your brand personality and product range. Each theme comes with a preview option and full demo stores, so take your time to experiment and see what each one looks like before making your decision.
Customizing Your Shopify Store
Once you’ve selected a theme that fits your store’s needs and aesthetic, it’s time to customize your Shopify store to reflect your brand. Personalizing your store is a crucial aspect of setting up your Shopify store as it helps to differentiate your brand from others, creates a memorable shopping experience for your customers, and builds brand trust and recognition.
Accessing the Customization Interface
From your Shopify dashboard, navigate to “Online Store” on the left-hand menu and select “Themes.” Here you will see your current theme; next to it is a button labeled “Customize.” Clicking on this button will take you to the theme customization interface.
Using the Shopify Dashboard and Customization Interface
The Shopify dashboard is where you can manage everything about your store, from adding products to reviewing orders, setting up payments, and much more. The customization interface is where you can adjust the look and feel of your store.
In the customization interface, on the left, you will see a section list that includes Header, Footer, Slideshow, Featured products, etc. These correspond to the different parts of your website. Clicking on each will allow you to adjust different aspects like colors, fonts, images, and more to match your brand’s aesthetic and feel.
Uploading Your Logo
A good starting point for customization is uploading your brand logo. You can do this by navigating to the “theme settings” in the customization interface and uploading your logo file under the “Logo” section.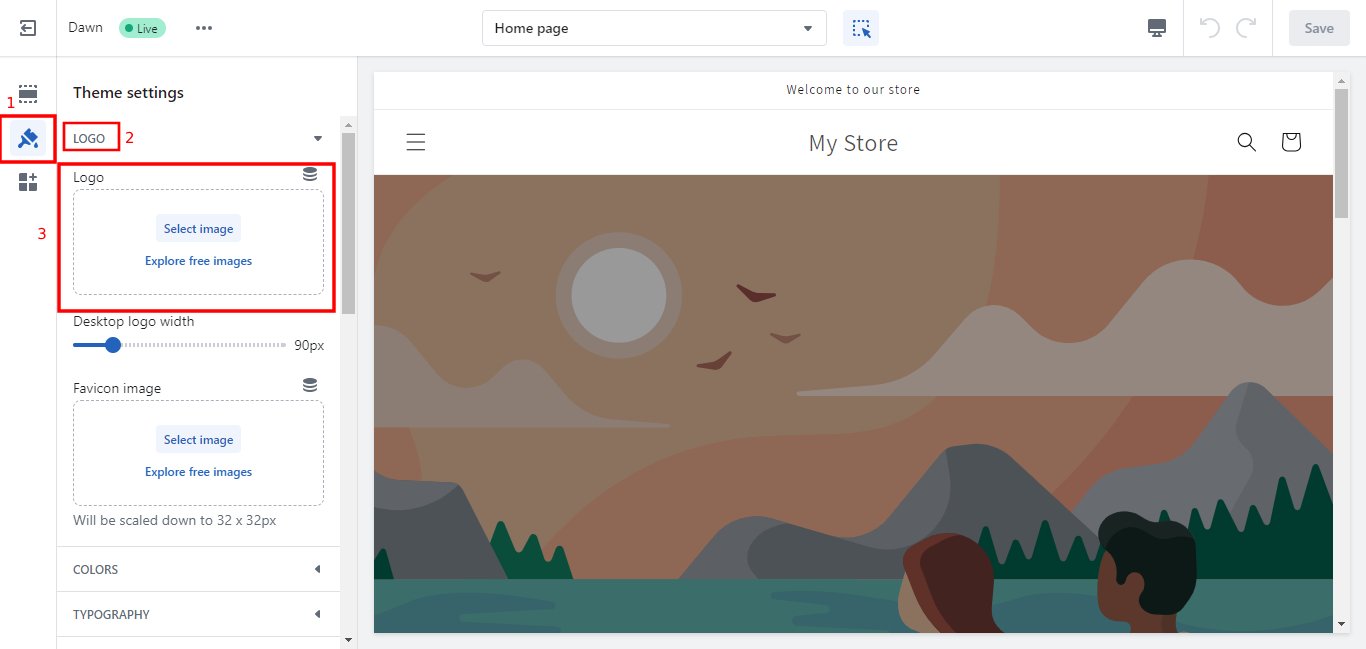
Customizing Colors, Fonts, and Imagery
Next, customize your website’s colors, fonts, and imagery to reflect your brand identity. You can access these options in the “Theme settings” tab in the customization interface. For instance, if you sell eco-friendly products, you might choose earth tones and nature-inspired images.
Customizing the Homepage
The homepage is the first page most visitors will see, so ensure it’s engaging and navigable. Add a compelling hero image, create a well-organized navigation menu, highlight key products or collections, and include customer testimonials or brand stories to make a solid first impression.
Remember, customizing your Shopify store is not just about aesthetics. It’s about creating a seamless and enjoyable shopping experience for your customers that represents your brand accurately and professionally.
Adding Products to Your Shopify Store
Once your Shopify store is visually set up and customized, it’s time to add products – the heart and soul of your online store. Here’s how you can add products, write compelling product descriptions, and set pricing:
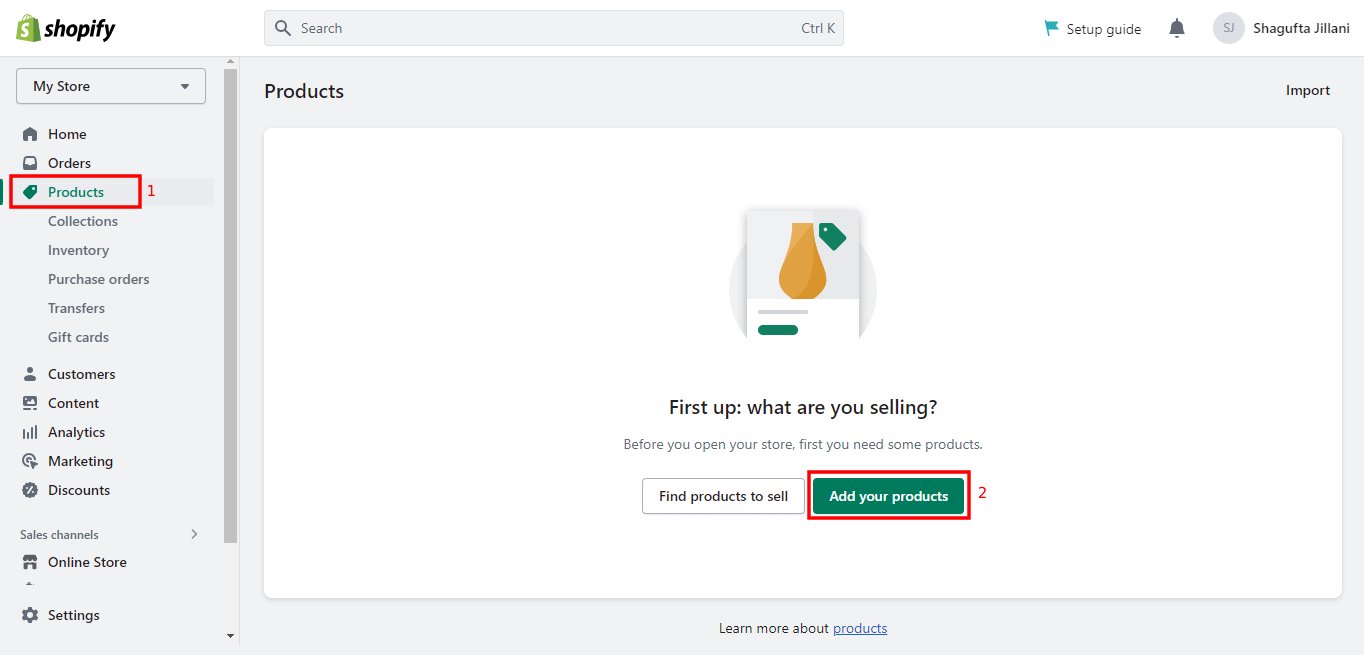
- Navigate to the Products Page: From your Shopify dashboard, click on “Products” in the left-hand menu. You will then see an “Add product” button towards the top right of the page.

- Enter the Product Details: Click on the “Add product” button to open the product details page. Here you will enter your product’s name and a detailed description.
When writing your product description, remember to be clear and comprehensive. Highlight the product features and benefits, and explain how it can solve a problem or improve the customer’s life. This is also a great place to incorporate SEO keywords to improve your product’s visibility in search results.
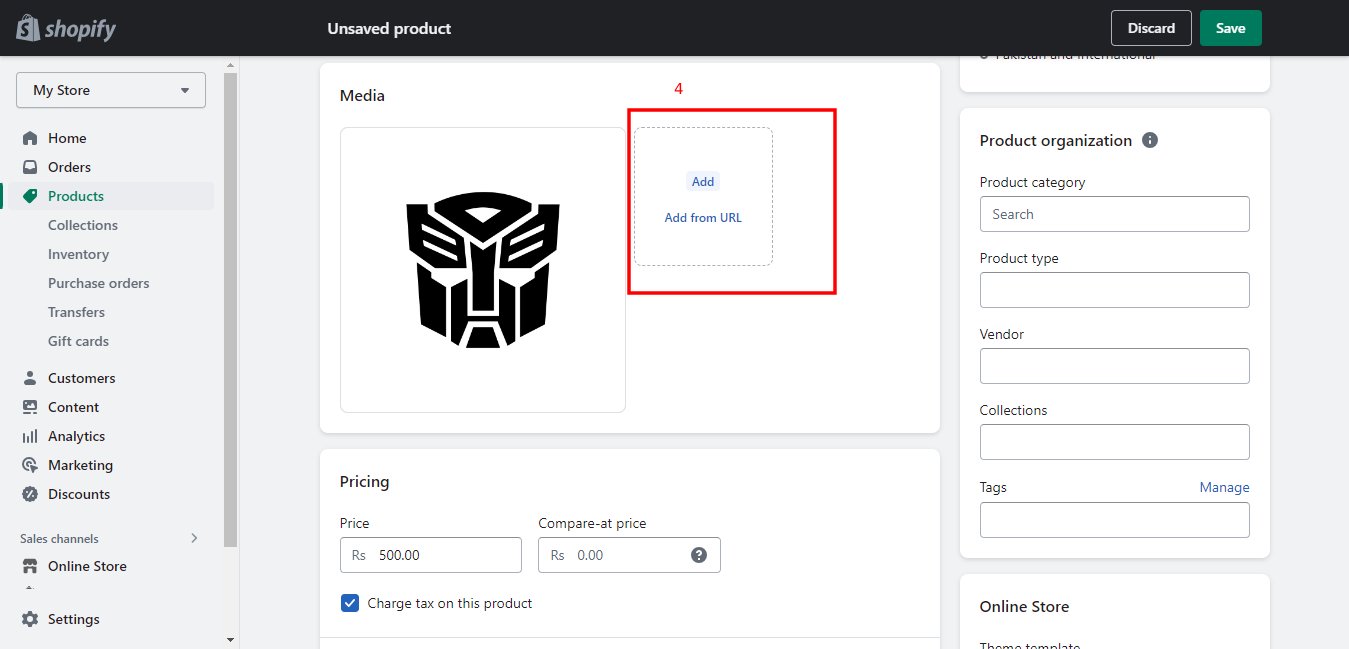
- Upload Product Images: Under the “Images” section, you can upload photos of your product. Ensure your images are high-quality and show the product from different angles or in use. This helps customers get a better understanding of what they’re purchasing.

- Set the Price: In the “Pricing” section, enter the price of your product. You can also enter a “Compare at price” to show customers a discounted price compared to the original one.

- Inventory and Variants: If you have SKU (Stock Keeping Unit) numbers, you can enter them in the “Inventory” section, along with the quantity of the product. If your product has different variants (like sizes, colors, etc.), you can add them in the “Variants” section.


- Shipping: In the “Shipping” section, enter the product’s weight and customs information if you’re shipping internationally.

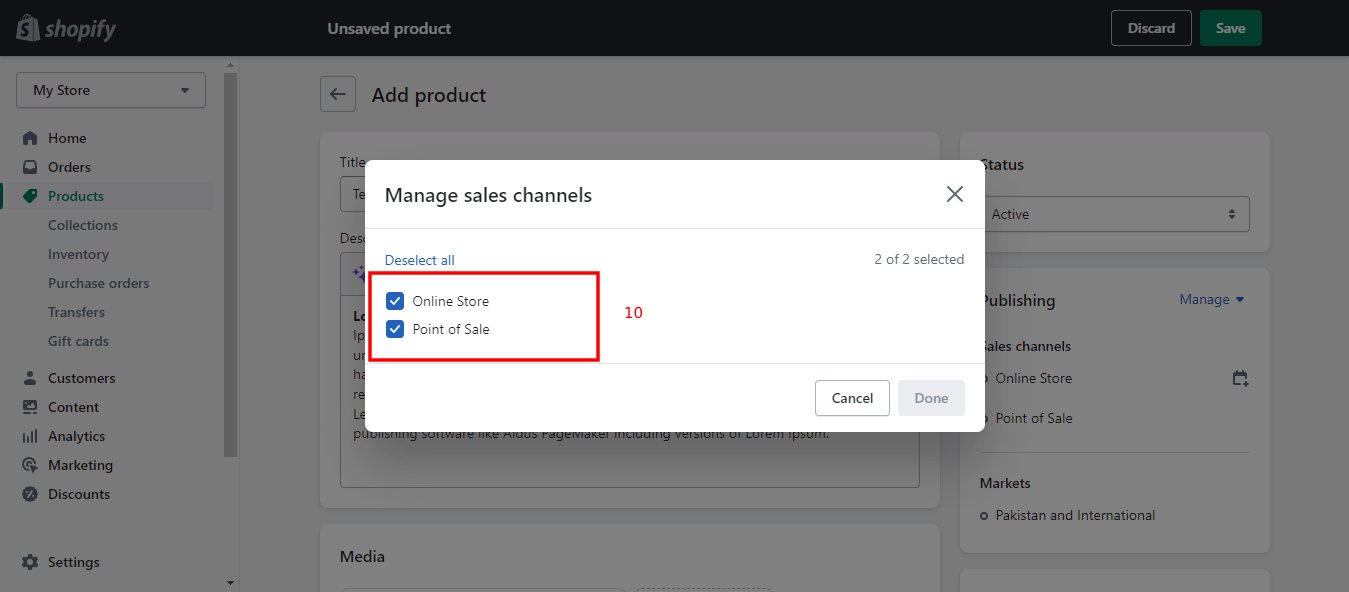
- Product Availability: Under the “Product status” and “Sales channels and apps” section, ensure that the product is active and available on all desired sales channels.


- Save: Once all information is entered, click the “Save” button. Your product is now live on your store!

Adding products is one of the most crucial parts of setting up your Shopify store. A detailed, SEO-optimized product description, high-quality images, and correct pricing can significantly influence a customer’s decision to purchase. Repeat these steps for all the products you wish to add to your store.
Setting Up Your Shopify Store’s Domain
After adding products to your store, the next step in setting up your Shopify store involves setting up your domain. While Shopify provides you with a default .myshopify.com domain, a custom domain can make your store look more professional and trustworthy, and it’s easier for customers to remember.
Here’s how to set up a custom domain for your Shopify store:
- Purchase a Domain: You can buy a new domain through Shopify or a third-party provider like GoDaddy or Namecheap. If you choose to buy through Shopify, the domain will automatically be configured for your store. If you purchase through a third-party provider, you will need to redirect the DNS records yourself.


- Add Domain in Shopify: Go to the Shopify admin dashboard. Click on “Online Store,” then select “Domains.”

- Connect Your Domain: If you bought your domain through Shopify, you could skip this step. But if you used a third-party provider, click on “Connect existing domain,” then enter your purchased domain name.


- Verify Your Connection: Shopify will verify your connection. If your domain doesn’t connect immediately, don’t worry, it can sometimes take up to 48 hours to process.

- Set as Primary: Once your domain is connected, you can set it as the primary domain. This means that all traffic to your other domains will redirect to this domain.
- Check SSL: Ensure your domain has an SSL certificate (this is automatically provided by Shopify). An SSL certificate secures your website and ensures customer data is safe, which can be critical for gaining customer trust.
Setting up a custom domain for your Shopify store is a valuable investment in your brand identity. A custom domain is easier to remember and can help build credibility with your customers, ultimately supporting your store’s growth and success.
Setting Up Your Shopify Store’s Payment Gateway
Setting up your payment gateway is an essential step in setting up your Shopify store. A payment gateway allows your store to accept payments from customers. Shopify makes this process straightforward by offering a variety of payment options.
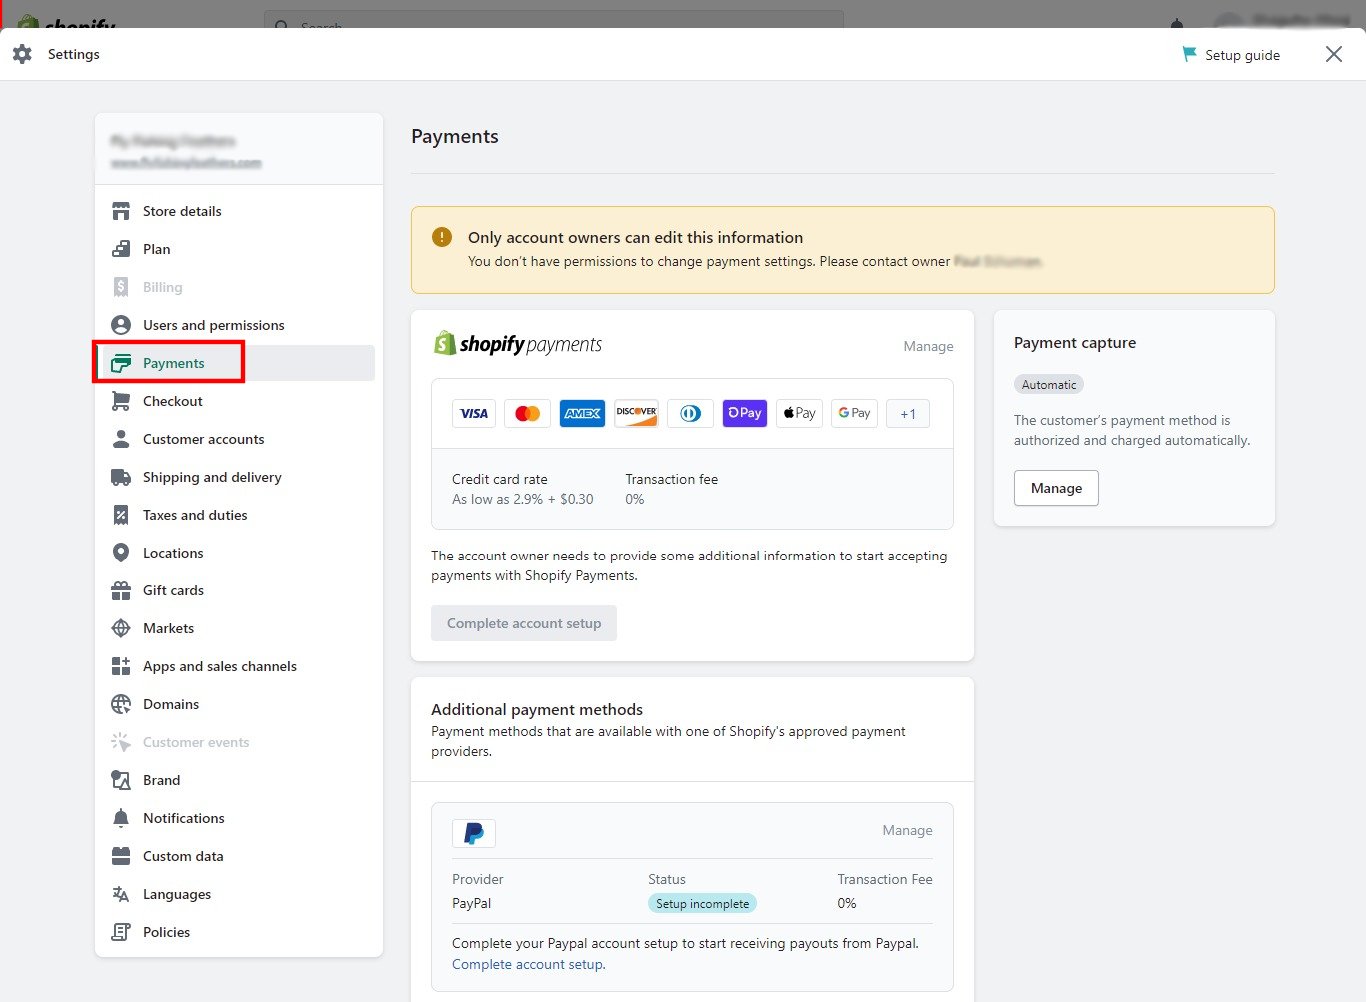
- Shopify Payments: This is Shopify’s integrated payment gateway. It’s easy to set up, provides seamless integration, and accepts most major payment methods. To set up Shopify Payments, go to your Shopify admin dashboard, navigate to “Settings,” then “Payments.” Click on “Complete account setup” under Shopify Payments and fill in the required information.

- Third-Party Payment Gateways: Shopify also supports numerous third-party payment gateways like PayPal, Stripe, and Amazon Pay. To set these up, go to “Settings,” then “Payments,” and click on “Choose third-party provider” under Third-party providers. Select your preferred provider and fill in the necessary details.


- Manual Payments: Manual payment methods include cash on delivery (COD), bank transfers, money orders, etc. To set these up, go to “Settings,” then “Payments,” and click on “Create custom payment method” under Manual Payments.
- Alternative Payments: These are other payment methods like cryptocurrency or digital wallets. To set these up, go to “Settings,” then “Payments,” and click on “Choose alternative payment” under Alternative payments. Select your preferred method and fill in the necessary details.
Remember, the best payment gateway for your store depends on your business model, your target audience, and the countries you’re serving. It’s crucial to offer multiple payment methods to cater to all your customers’ preferences. Once you’ve set up your payment gateway, you’re ready to start accepting orders on your Shopify store!
Setting Up Your Shopify Store’s Shipping Settings
Setting up your shipping settings is another crucial step when setting up your Shopify store. A clear and fair shipping policy can improve customer satisfaction and reduce cart abandonment rates. Here’s how you can set up shipping settings based on your business model:
- Access Shipping Settings: Go to your Shopify admin dashboard, navigate to “Settings,” then click on “Shipping and delivery.”

- Create Shipping Zones: Shipping zones are the geographical areas where you deliver products. You can create different shipping zones based on countries or regions. Click on “Manage rates” next to the profile where you want to add a shipping zone, then click “Add rates.”


- Set Up Shipping Rates: Within each shipping zone, you can set up shipping rates. These can be free, flat-rate, or calculated (based on weight or value of the order).

- Free Shipping: Offering free shipping can encourage customers to make a purchase. You can incorporate the shipping cost into your product pricing to cover this.
- Flat Rate Shipping: This is a fixed shipping cost regardless of order size, weight, or destination within the shipping zone. It simplifies calculations for both you and your customers.
- Calculated Shipping Rates: These are calculated based on the order’s weight or total price, and the customer’s location. This can be more fair and accurate, especially for large or heavy items.
- Set Up Shipping Policies: It’s also important to clearly communicate your shipping policies to your customers. Include information about shipping times, methods, tracking, international customs, and any other relevant details.
- Offer Local Pickup or Delivery: If you have a physical store or if your business model allows, you can also offer local pickup or delivery. This can be set up in the “Local pickup” and “Local delivery” sections.


Remember, your shipping settings should align with your business model and customer expectations. Review your shipping settings regularly and adjust them as necessary based on customer feedback, shipping cost changes, or changes in your business model. With your shipping settings in place, you’re another step closer to launching your Shopify store!
Advanced Tips to Optimize Your Shopify Store
While setting up your Shopify store with the correct theme, products, domain, payment gateway, and shipping settings is crucial, optimizing your store can take your business to the next level. Here are some advanced tips:
- SEO and Keywords in Product Descriptions: SEO (Search Engine Optimization) is a critical aspect of any online business. By incorporating relevant keywords into your product descriptions, you increase the chances of your products showing up in search engine results, driving more organic traffic to your store. Ensure your descriptions are informative, engaging, and include the keywords your customers are likely to search for.
- Mobile Optimization: As more customers use their mobile devices for online shopping, ensuring that your Shopify store is mobile-optimized is essential. A mobile-optimized store provides a seamless shopping experience across different devices, from desktops to tablets to smartphones. Shopify themes are responsive, meaning they automatically adjust to the device’s screen size. Regularly test your store on different devices to ensure a seamless user experience.
- Integration with Social Media Platforms: Integrating your Shopify store with social media platforms can significantly boost your store’s visibility and sales. Shopify allows you to connect your store with platforms like Facebook, Instagram, and Pinterest. You can then sell directly through these platforms, reaching your customers where they already spend their time. You can set this up through the “Sales channels” section in your Shopify admin.
- Use Analytics: Shopify provides built-in analytics tools that allow you to understand your customers’ behavior, track sales, and measure your store’s performance over time. Use this information to adjust your strategies and continually optimize your store.
- Optimize Checkout Process: A smooth and straightforward checkout process can reduce cart abandonment and increase conversions. Allow guest checkouts, offer multiple payment methods, and show all costs upfront to make the checkout process as seamless as possible.
Setting up a Shopify store is just the beginning. Continual optimization based on SEO, mobile responsiveness, social media integration, and data-driven insights will ensure that your store is not only set up for success but is also prepared for sustainable growth. The Ultimate Guide to Setting Up Your Shopify Store wouldn’t be complete without a strong focus on optimization strategies.
How to Monitor and Grow Your Shopify Store
After setting up and optimizing your Shopify store, your journey is not over. Monitoring your store’s performance and focusing on growth strategies is key to your business’s success. Here are some ways to monitor and grow your Shopify store:
- Use Shopify Analytics: Shopify’s built-in analytics tools are a treasure trove of information about your store’s performance. These tools provide insights into your sales, customer behavior, and much more. You can use this information to identify trends, optimize your marketing efforts, and make data-driven decisions for your business. Regularly review your Shopify analytics and adjust your strategies based on your findings.
- Marketing and Promotion: Marketing your Shopify store is essential to attract customers and drive sales. This can involve various strategies, including SEO, content marketing, email marketing, social media marketing, and paid advertising. Try different strategies to see what works best for your business and continually optimize your marketing efforts based on your results.
- Email Marketing: Building an email list and regularly sending out newsletters can help you keep in touch with your customers, promote new products, and encourage repeat purchases.
- Social Media Marketing: As mentioned earlier, integrating your Shopify store with social media platforms can boost your visibility. Regularly posting engaging content and interacting with your followers can help build a strong online community around your brand.
- Paid Advertising: Paid advertising, such as Google Ads or social media ads, can help you reach a broader audience. This can be especially useful for new stores or for promoting special sales or new products.
- Customer Service: Providing excellent customer service can set your store apart and help build a loyal customer base. This can involve responding promptly to customer inquiries, resolving issues effectively, and going the extra mile to ensure customer satisfaction.
- Scaling Your Shopify Business: As your Shopify store grows, you will need to scale your business to handle increased demand. This can involve expanding your product range, targeting new markets, automating tasks, or hiring staff. Look for signs that your business is ready to scale, such as consistent sales growth, and plan your scaling strategy carefully to ensure sustainable growth.
Remember, setting up your Shopify store is only the first step. Regularly monitoring your store’s performance and focusing on growth strategies will ensure that your store continues to thrive in the long term.
Conclusion
Setting up your Shopify store is a journey, but with this ultimate guide, you now have the roadmap you need to embark on your e-commerce adventure. We’ve covered the essentials, starting with why you should choose Shopify, the steps to set up your Shopify store, including signing up, selecting your theme, adding products, setting up your domain, payment gateway, and shipping settings. Beyond the setup, we delved into advanced tips to optimize your store for SEO, mobile usage, and social media integration, and we concluded with ways to monitor and grow your Shopify store.
The beauty of setting up a Shopify store lies in the platform’s versatility and ease of use. Whether you’re a seasoned entrepreneur or just starting, Shopify provides the tools you need to create a professional and successful online store.
Don’t be afraid to take the first step. Start setting up your Shopify store today, and join the ranks of successful online entrepreneurs. Remember, every big business starts small, and with consistent effort, monitoring, and optimization, you too can set up a Shopify store that scales.
This journey might have its challenges, but as you progress, you will find that the benefits outweigh the hurdles. So, here’s to your success in setting up your Shopify store and creating a flourishing online business!
Frequently Asked Questions
How much does it cost to set up a Shopify store?
The cost to set up a Shopify store can vary depending on your specific needs. The Basic Shopify plan starts at $29 per month. This includes access to all the basics for starting a new business. There are also Shopify ($79/month) and Advanced Shopify ($299/month) plans that offer more features. Additional costs might include purchasing a domain name, buying a premium theme, or using paid apps from the Shopify App Store.
Can I set up Shopify store by myself?
Absolutely, Shopify is designed to be user-friendly and allows you to set up your store by yourself without needing advanced technical skills. From creating an account to setting up your store's design, adding products, and setting up payment gateways, every step is well-guided within the Shopify interface.
How do I set up a new Shopify store?
Setting up a new Shopify store involves several steps. First, you need to sign up for a Shopify account. Then, you choose a theme for your store and customize it to suit your brand. Next, you add products to your store and set up your domain. Finally, you set up your payment gateway and shipping settings. For a detailed guide, refer to the above sections in this article.
Can I set up a Shopify store for free?
Shopify offers a 14-day free trial that allows you to set up your store and explore the platform's features without committing to a paid plan. However, to continue using the platform and to start selling products after the trial period, you will need to choose one of the paid plans.
How to earn money on Shopify?
Earning money on Shopify typically involves selling products or services. You can sell physical products, digital products, services, and more. You earn money when customers make purchases from your store. Additionally, you can also earn money through affiliate marketing or by selling advertising space on your website if your store gets a lot of traffic.
Is owning a Shopify store profitable?
Owning a Shopify store can be profitable, but it depends on various factors. These include the types of products you sell, your pricing strategy, your marketing efforts, your store's overhead costs, and the level of competition in your market. Like any business, it requires hard work, strategic planning, and time to become profitable.


